The Most Common Causes of Breakdowns for Ceiling Hoists and how to Reduce them
15 Minute Read
Ceiling hoists and tracks are a huge investment and crucial to the daily lives of those in care homes, SEND schools and hospitals. They are relied upon by care staff to deliver the care that users need. This continual use means wear and tear are caused to both the hoist unit and tracks which if left, can eventually cause the equipment to stop working.
As a company that is routinely called out to repair ceiling hoists, we’ve put together this list of the 5 most common causes of breakdowns with ceiling hoists and how to reduce them. This will give you and your staff a better understanding of what could go wrong so you can try and avoid it in the future.
1. Depleted (flat) Batteries
Batteries are used in ceiling hoists with docking charge and handset charge methods. When the batteries are flat, not holding their charge or not charging at all, it can cause the ceiling hoist unit to stop working or it might only work on the lowering function but not the lift function.
There are several causes for battery-related breakdowns:
Flat battery
When the battery is flat, it is usually because it hasn’t been charged, not been charged for long enough, or not been charged systematically (routinely every day). Ceiling hoists are used in busy environments and staff have many conflicting priorities. So, it’s common for the hoist to not be put back on charge, or to only be on charge for a small amount of time before it’s used again.
Batteries not holding their charge
If batteries are only charged little and often, they will eventually lose their ability to charge fully and retain their charge. They like to be fully charged each time and left on charge when not in use. But rest assured, it won’t do the batteries any harm being left on charge all the time.
Batteries not charging
Another common cause of battery related call-outs is the battery not charging at all. This is usually due to a connection issue that stops it from charging correctly. For handset charge methods, the connections are inside the wire which connects the handset to the hoist motor. If this is pulled with excessive force, these connections can loosen which stops it from charging. This can happen when the hoist unit is pulled by the handset. Docking charge methods can be subjected to heavy use at the end of the rail which can cause the connections to become damaged and stop working.
Reduce battery related breakdowns for ceiling hoists:
To reduce the chance of having flat batteries, simply make sure your ceiling hoist is always put back on charge. If you find batteries are frequently left off charge, consider refresher training for all staff, as well as stickers and posters to help remind everyone to charge it. If they are consistently kept on charge when not in use, this will also ensure your batteries retain the charge they are getting.
When charging the ceiling hoist, it is good practice to check it is engaging and connecting properly with the charger. This can either be through a click, a bleep or a charging light on the hoist unit or charger. If the connection hasn’t been made properly, it won’t charge.
Note: Just because the hoist or handset is in the charging position, this doesn’t necessarily mean it is charging. For example, if the charger has been turned off in error, the hoist won’t charge, even though it’s correctly connected to the charger. The best practice is to look for some kind of confirmation, such as the charging light, to ensure it’s charging.
Ensure staff aren’t pulling the hoist by the handset or being too heavy-handed when docking it at the end of the rail – as both of these can cause charging issues. It might be they need training on how to use the specific ceiling hoist and charging method. See point 3 below on hand control not working.
If this is the case, Medaco can provide in-house training or a video to help all current and future staff understand the importance of looking after ceiling hoist batteries.
2. Emergency Stop Cord Pulled
The emergency stop cord being pulled is a very common reason for call outs with ceiling hoists. When the emergency stop cord is pulled, it stops the hoist from moving and prevents any further operation.
Staff commonly believe the hoist has stopped working because they may not realise the cord has been pulled accidentally, either by themselves or by someone else, such as a student in a school or dementia resident in a care home.
Reduce emergency stop cord callouts for ceiling hoists:
Check and reset: Whilst you can’t stop accidental pulling of the cord, you can make sure you check if it’s been pulled before you call out an engineer. If it has, you can easily reset it and test the hoist again. This may have just saved you a call out charge and further downtime, as the hoist, is now back up and running.
Even though ceiling hoists vary across different manufacturers, the emergency stop function is a safety feature and therefore similar from hoist to hoist. It is a red pull cord that hangs down from the hoist – making it accessible for all.
Below are various ceiling hoist pods, the location of their emergency pull cord and how to reset it:


3. Hand Control not Working
Every ceiling hoist is operated by a hand controller, no matter what charge method or how many functions it has. Either just to move it up and down, or to move it along the rail too. Medaco is often called out to look at hoists with handset issues or asked to supply ceiling hoist handsets for customers to fit themselves. The handset can stop working completely, or they might be intermittent, and work on the ‘down’ button, but not the ‘up’.
Handsets are generally robust parts but they can receive heavy use in high usage areas such as SEND schools and care homes. There are several causes of faulty handsets and unfortunately, they mostly occur through incorrect use. Common problems we see with handsets are people pulling/stretching the handset too much and the connections inside breaking or coming loose. This usually occurs when the hoist unit is pulled along the rail by the handset, rather than using the lift tape or sling bar. Handsets are not designed to be used to pull the hoist along the rail.
Handsets can also get caught in doors or trapped in shower screens which also causes damage to either the wire or the handset itself.

Reduce handset related breakdowns for ceiling hoists:
Staff training is key to reducing this issue. Regular refresher training on how to use the specific hoist, as well as how to maintain it should help reduce this type of call out or need for replacing the handset. Hoists mustn’t be pulled along by their handset and cord, even with nobody in the hoist.
Depending on your hoist, you may have another hoist that uses the same handset which you can substitute to see if a different handset works before calling out an engineer. You may need a replacement handset that we can send to you on next day delivery which reduces the cost of a call out. However, this option is only possible on the hoist where the handset connects to the outside of the hoist (as shown in the image below). Some hoists, like the Molift Air option, are connected directly to the PCB inside the hoist, hence will need to be changed by an engineer.

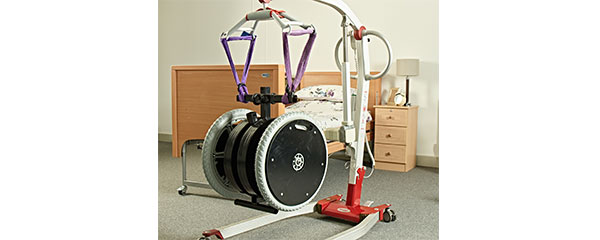
4. Ceiling Hoist Lift Tape Frayed
All ceiling hoists use lift tapes to lift and lower the user. When the lift tape is subjected to friction against the side of the hoist unit, it causes the edges of the lift tape to fray. Over time, this creates vulnerability in the lift tape and is a safety issue for the hoist.
Lift tape is designed to move vertically up and down and not at an angle. However, during some transfers, most commonly on a straight track rail, a user can be slightly off the centre line which causes the lift tape to rub against the edges of the plastic casing of the ceiling hoist. This issue also commonly occurs in rooms with lower ceilings because it is more likely to create a steeper angle on the lift, so greater friction occurs.
The main cause of this issue is incorrect use when performing a transfer. However, it might be that the ceiling hoist design and layout isn’t suitable for the room or user’s needs which can change over time. For instance, if you have a straight track rail that doesn’t provide the coverage needed, it might be time to consider an H-Frame design.
Reduce lift tape fray on ceiling hoists:
To reduce fray on your ceiling hoist lift tape, provide regular training to your staff on how to use the specific ceiling hoists within their workplace. Whilst generic manual handling training is great for understanding how to carry out manual handling safely, including good techniques, it doesn’t always cover how to use specific manual handling equipment correctly, to reduce wear and tear.
Care staff should ensure correct and accurate positioning of the hoist and service user, so the unit is directly overhead and the lift tape is always vertical during the lift.
Some manufacturers have designed their hoists with features that try to prevent this problem from happening.
For example, the Molift air ceiling hoist is designed with an angle sensor that prevents lifting when the lifting tape angle is too steep, or the lifting tape is twisted. If this happens, the angle sensor will beep and the lift tape will stop moving. Once the lift tape is at the correct angle, it will allow the lift to continue.

The Likorall ceiling hoist directional safety feature is called the SSP limit switch. The lifting motion will stop automatically if the lift strap is subjected to harmful strain such as it being pulled sideways or folded over. As with the Molift, the lift can once again be operated once the lift strap is vertical.

5. Overloading the Equipment
All ceiling hoists and tracks are designed to withstand a certain weight. This is called the Safe Working Load (SWL). If the equipment is overloaded, it causes damage as it’s working above its intended capacity. This puts excess pressure on the lift motor and batteries which over time can stop working.
Note: The Safe Working Load applies to the lift, sling bar, sling and any other accessories used. The maximum load is always the lowest maximum load rating for any of the components used. For example, if the hoist unit is approved for 200kg but is equipped with a sling bar which is approved for 300kg, the maximum load of 200kg applies as this is the lowest rating.
If you have any questions regarding this, contact Medaco who are happy to advise.
Reduce equipment overload related breakdowns for ceiling hoists:
The best way to prevent this problem from occurring is to ensure staff using the ceiling hoists are checking the safe working load every time they use it. This ensures the user’s weight, together with any accessories such as slings and hoist scales, do not exceed the safe working load which is marked on the equipment. You may need to provide additional or refresher training, especially if your staff turnover is high or if you have installed new equipment.
Note: If the Safe Working Load is not visible on the equipment, it should not be used and must be taken out of service.
Taking care of your Ceiling Hoist
Prevention is always better than cure. So, maintaining your ceiling hoists in between your LOLER inspections and PPM visits will help to reduce these common causes of breakdowns, prolong the lifespan of your equipment, reduce equipment downtime and reduce costs of call outs and maintenance.
Check out these 7 maintenance tips to prolong the lifespan of your patient handling equipment:
Training is key
Employers need to ensure their staff receive sufficient training and information on the specific equipment in their workplace which goes beyond generic manual handling training. It is important that supervisors and managers also receive training so they can monitor, identify and correct poor practices which can cause some of the breakdown issues mentioned above. Training should be provided when new ceiling hoists are installed or new staff are introduced.
As mentioned before, by preventing and reducing these common causes of breakdowns, your care facility can reduce equipment downtime as well as reduce costs for call outs and repairs. Ask your service company to provide a summary of your recent call-outs to see if there are recurring issues.
If you find that you are experiencing an increase in equipment downtime, speak to Medaco to see how we can help.
You ask – We answer
This blog is from a new series focusing on ‘You ask – We answer’ where we aim to answer the hard-hitting questions our customers are asking. If you have a burning question you would like answered, just type it in the box below.
Interested in more articles like this? Sign up below to get notifications of new articles published.
If email isn’t your thing, follow us on our social channels for all the latest updates from Medaco.